A Comprehensive Beginner's Guide to Needle Felting Techniques and Tips
- Suzan Baldoumas
- Mar 8
- 5 min read
Updated: Mar 28
Please read all the way through this post before starting your project.
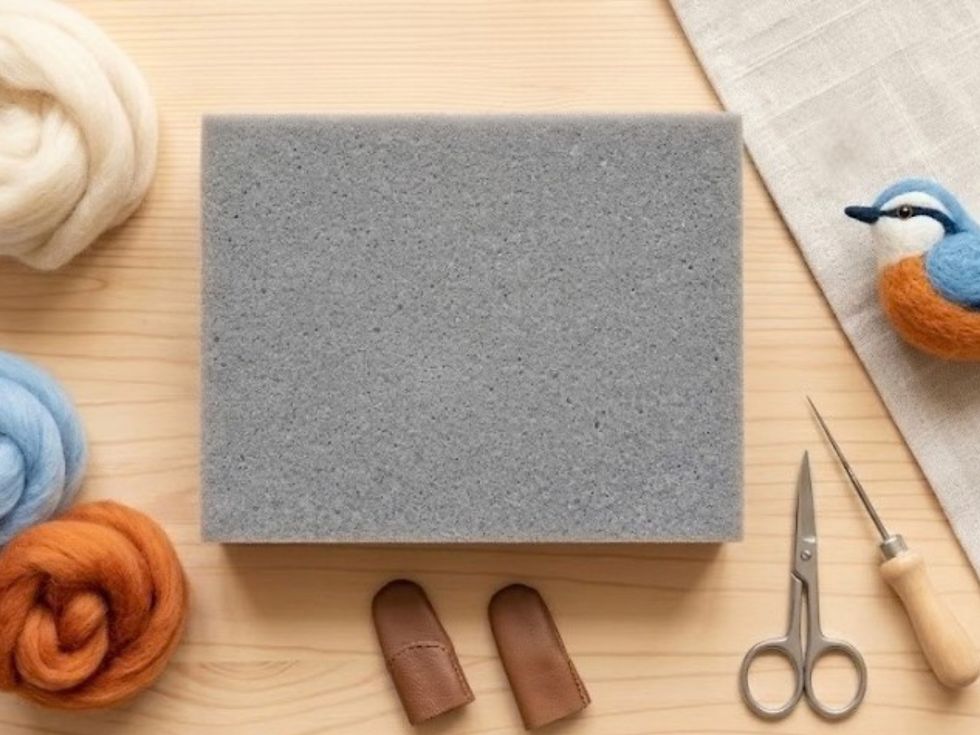
What You Need to Begin Needle Felting
Felting wool roving: This is the soft, fluffy wool that you will shape and felt. Roving is more refined and softer than felting wool but either work.
Felting needle: A special needle with tiny barbs that tangle wool fibers together.
Foam pad or felting mat: A surface to protect your needle and work safely.
Optional tools:
- Finger guards to protect your fingers from accidental pokes.
- Cookie cutters to help shape wool into consistent forms.
- Small scissors for trimming stray fibers.
Step 1: Set Up Your Workspace
Choose a stable table with good lighting. Place your foam pad or felting mat on the surface. Arrange your wool, needle, and any tools within easy reach. Good lighting helps you see the fine wool fibers clearly, which is important for detailed work.
Step 2: Pull Off a Small Amount of Wool
Start with a small piece of wool roving. Instead of cutting the wool, gently pull it apart. This keeps the fibers soft and easier to work with. Pulling also helps you control the amount of wool you use, which is important for shaping.
Step 3: Shape the Wool Loosely
Form the wool into a loose shape that matches your intended design. Beginners should start with simple shapes like balls, ovals, hearts, or flowers. You can roll, fold, or bunch the wool to create these shapes. At this stage, the wool should still feel soft and fluffy.

Step 4: Begin Felting
Place your wool shape on the foam pad. Hold the felting needle straight up and down, then poke the wool repeatedly. The needle’s barbs catch the fibers and tangle them together, making the wool firmer and more compact. Keep your fingers clear of the needle’s path to avoid injury.
Step 5: Turn the Piece Often
Rotate your wool piece regularly to felt it evenly. If you only poke one side, that side may become flat or misshapen. Turning the piece helps maintain a balanced shape and smooth surface.
Step 6: Refine the Shape
As the wool firms up, use your hands to adjust the shape. Add small amounts of wool where you want more volume, then felt those areas until the new wool blends seamlessly. This step allows you to sculpt your piece with more precision.
Step 7: Add Details
Use tiny bits of contrasting wool to add details like petals, spots, eyes, leaves, or patterns. Lay the detail wool on top of your base shape and poke gently until it attaches firmly. This technique lets you create intricate designs and bring your project to life.

Step 8: Smooth and Firm the Surface
Continue felting until your piece feels solid and holds its shape well. Lightly poke any fuzzy or loose fibers to tuck them in. This final felting step gives your project a polished look and ensures durability.
Step 9: Finish Your Project
Trim any stray long fibers with small scissors if needed. Your felted piece can remain as it is or be turned into an ornament, brooch, decoration, or embellishment for other crafts. The possibilities are endless once you master the basics.
Beginner Tips for Successful Needle Felting
Always poke the needle straight up and down to prevent it from breaking.
Keep your fingers away from the needle’s path to avoid accidents.
Start with simple shapes before attempting animals or complex designs.
Add wool gradually; it is easier to build up than to remove excess.
Felt firmly for a solid shape, but avoid over-felting which can make the wool too dense.
When working with wool, artists often talk about two different approaches: 3-dimensional needle felting (sculpting) and 2-dimensional wool felting, which is often called wool painting or needle-felted painting.
Sculpting with Felt (3D Needle Felting)
In sculptural needle felting, wool is shaped into a three-dimensional form. Using a barbed felting needle, the fibers are repeatedly poked so they tangle and compress into a firm structure. The artist builds the form gradually, adding small amounts of wool and shaping it from every side. This method is similar to sculpting with clay—creating volume, curves, and structure until the piece becomes an object such as an animal, figure, ornament, or decorative sculpture.
Painting with Felt (2D Wool Painting)
Painting with wool is usually called wool painting, needle-felted painting, or sometimes fiber painting. Instead of building a solid object, the artist places thin layers of colored wool onto a flat surface such as felt fabric or a wool base. The fibers are lightly felted into place to create an image. Different colors of wool act like brushstrokes, blending together to form landscapes, flowers, animals, or abstract designs. The finished work stays mostly flat, much like a traditional painting.
The Key Difference
Sculpting with felt: builds form and volume (3D objects).
Wool painting / needle-felted painting: builds images with color on a flat surface (2D artwork).
Both techniques use the same basic material—wool fiber—but the artist chooses whether to create a sculpture in space or compose a picture with fiber instead of paint.
Felting Needles
Felting needles are the main tool used in needle felting, and they are quite different from ordinary sewing needles. They are very sharp and thin, with tiny barbs along the shaft. These barbs are what make needle felting possible. Each time the needle goes into the wool and comes back out, the barbs grab the fibers and pull them together, tangling them so the wool gradually becomes firm and holds its shape.
Because felting needles are so sharp, it’s important to work slowly and keep your fingers out of the path of the needle. Many beginners like to use a foam pad or felting mat under their work and sometimes finger guards for extra protection. Felting needles can also break if they are bent, so it helps to poke straight up and down rather than at an angle.
You may notice that felting needles come in different sizes and types, which are designed for slightly different tasks. Some of the most common include:
Coarse needles – These have larger barbs and are great for the early stages when you are shaping and firming up wool quickly.
Medium needles – A versatile choice used for general felting and shaping.
Fine needles – These create smaller holes and are often used for finishing work or adding delicate details.
There are also different needle shapes, such as triangle, star, and spiral needles, which change how the fibers move and how quickly the wool felts.
All of this might sound complicated at first, but the good news is that you don’t need to worry too much about needle types when you’re just starting out. Most beginners do perfectly well with a single medium felting needle. As you gain experience, you may naturally begin to experiment with different needles to see which ones you enjoy using for shaping, detailing, or smoothing your projects.
In the beginning, the most important thing is simply to practice the motion and enjoy the process of turning soft wool into something solid and handmade.
If you'd like to get started right away, you can purchase a complete needle felting kit with all the materials included. 👉 Browse Needle Felting Kits


Comments